Help with rapidly deteriorating photo of recently deceased grandpa?
July 16, 2012 8:44 PM Subscribe
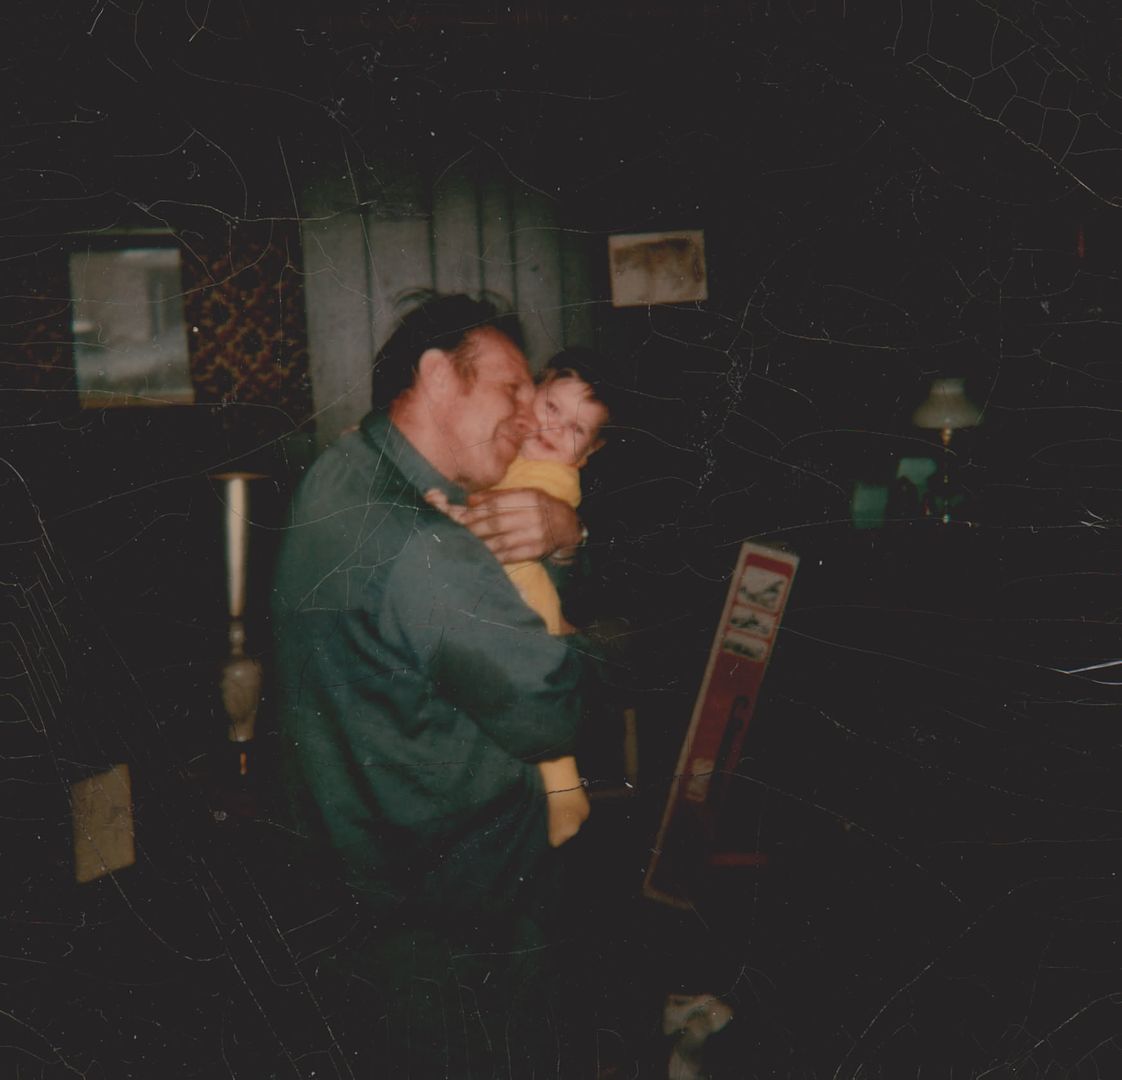
Can someone tell me how to go about saving/restoring this beloved photo of my grandfather?
My grandfather died on Saturday evening. This (very large hi res image) is a photo of him and myself when I was a baby. He used to come home from work every night, put Slim Whitman records on the record player, and dance with me around the room. Yeah, he was an oddball, but I've never felt as loved by another human being as I did by him.
Unfortunately, as you can see, the photo is in horrible condition. It was in an old photo album of mine and the last time I looked at it was about seven years ago, and it looked ok then, but I was shocked by the state of it when I took it out today. I'm at a loss as to how to go about saving this photo. Obviously, I've scanned it, so at least if the original completely disappears, I'll have a copy that won't look any worse than it does right now. I'd like to fix it somehow. I don't have the money for a professional photo restoration service. I do have access to Photoshop (CS6), but I'm just learning the program and so I have absolutely no idea how to even start trying to fix this. I don't even know what all the buttons and tools in photoshop do at this point. I've tried googling for help, but none of the tutorials I've found seem aimed at someone who's a complete novice at Photoshop. As in, "If your photo looks like this, you should press this button located in this physical location, and use these settings and then move the tool/brush/whatever in this particular way".
Can someone who knows something about this stuff tell me how to go at this, or give me some tips, or if it's a lost cause and someone with my experience level (ie. none) shouldn't even bother, that's ok too. Ideally I'd like to fix this up enough that I could have it reprinted. I know it won't ever look perfect (it wasn't that great/high quality a photo to begin with), but I at least want a copy I can keep around.
Best answer: I've had some photos restored by professionals: I asked once, and they told me that basically they copy 'good' parts to make patches over the 'bad' parts --- i.e., say there was a rip in a subject's shirt. They'd use little bits from the good parts of the shirt to fill the hole, because it would be the right visual texture and color.
What I'd suggest you do is make a digital copy, and work on that with Photoshop: that way, by leaving the original alone, you really don't risk additional damage to the irreplaceable original.
And your grandfather sound like a heck of a guy: you were sure lucky to have him!
posted by easily confused at 8:53 PM on July 16, 2012
If I were you I would ask around on reddit. There have been some recent threads where people have done some pretty impressive restorations of old photos. You could contact the best people and ask for tips, or ask for their rates to do the job for you if they would be open to it. Here are some recent threads:
http://www.reddit.com/comments/wb5bn
http://www.reddit.com/r/pics/comments/umkes/reddit_i_most_humbly_implore_your_assistance_in/
posted by cairdeas at 8:55 PM on July 16, 2012 [4 favorites]
http://www.reddit.com/comments/wb5bn
http://www.reddit.com/r/pics/comments/umkes/reddit_i_most_humbly_implore_your_assistance_in/
posted by cairdeas at 8:55 PM on July 16, 2012 [4 favorites]
Response by poster: zadcat: "I take it you don't have the negative?"
No I don't unfortunately. If only.
posted by katyggls at 9:10 PM on July 16, 2012
No I don't unfortunately. If only.
posted by katyggls at 9:10 PM on July 16, 2012
Best answer: I've started fiddling around with it - my insomnia is your gain.
Here's where I am so far, and this is the sort of contrast/sharpening I might apply to it once I've removed more of the dust/scratches.
To do this, I simply created a layer above the background and have been carefully repairing the lines using the healing brush, clone tool and occasionally the patch tool. It's simply a matter of going over them very carefully and painstakingly.
I'd always do the work on a separate layer so that you can easily undo any section that you don't think looks quite right.
I'm afraid I'm going to have to come back to this one later, but I will get to it in the fullness of time.
posted by Magnakai at 9:30 PM on July 16, 2012 [3 favorites]
I would duplicate the layer (so you always have the original as the background layer) and use the spot healing tool (with a brush size slightly larger than the cracks in the photo). Once all the cracks are 'healed' - then save and experiment with auto levels and auto contrast - or manually manipulating levels/contrast to see if you can improve it.
Alternately, I've had success with reasonably priced photo restoration from ScanCafe - though that requires you to send them your photo (and they send it to India). I've sent many precious old family photos and have had great results (and no photos were lost or damaged!).
(this assumes that your photoshop has the spot healing tool - i only have photoshop essentials to check with - and it did a good job on the cracks in your photo)
posted by nightwood at 9:33 PM on July 16, 2012
I would say to be content with your scan for now, perhaps enjoying a few kind adjusted versions from sweethearts on the internet, but save up for a professional restoration. Nothing compares to the excellence and longevity of a true restoration. Then get it framed with archival materials. You'll be glad you did.
You can keep the picture protected from further damage and aging by placing it between two pieces of acid-free mat board (even acid-free paper would be better than nothing) then slipping it into a mylar sleeve.
posted by batmonkey at 9:34 PM on July 16, 2012 [1 favorite]
You can keep the picture protected from further damage and aging by placing it between two pieces of acid-free mat board (even acid-free paper would be better than nothing) then slipping it into a mylar sleeve.
posted by batmonkey at 9:34 PM on July 16, 2012 [1 favorite]
Best answer: Cleaning up the many cracks and lines helps, as does a little boost and adjust on the colours. But there's just no depth in any of the dark areas – too bad the negative's not available, there might be a lot more to the original image.
Here's my version.
My condolences for your loss.
posted by zadcat at 9:48 PM on July 16, 2012 [4 favorites]
Here's my version.
My condolences for your loss.
posted by zadcat at 9:48 PM on July 16, 2012 [4 favorites]
Best answer: If you are interested in actually learning Photoshop, it is not a lost cause. This can actually be a great project to revisit time and again as you improve using the software.
Photo repair falls into a variety of techniques. Whenever I retouch photos, I use almost every trick in the book. And having worked with other graphic designers, I find that people very rarely have exactly the same workflow. So, it's more about learning your tools and when to apply them. You should hunt down tutorials for each of these techniques, then work your way up to the final restoration.
Layers: NEVER work directly on the original layer. Put groups of changes on different layers in order to play with various ways of blending them together via masks, blending modes, etc. And when it comes to color adjustments, work with adjustment layers.
Brushwork: The bulk of your retouching will be here. Healing and clone brushes work using sampled pixels. Dodge, saturation, and burn tools tweak color intensity and contrast. Regular brushes just let you paint with a single color. All have variable brush sizes, softness, and opacities. A tablet will really give you an edge here, and if you're naturally good at color and drawing, that'll help as well. Resist the urge to just clone-bush everything in large swathes, as it's easy to get a very artificial rubber-stamp effect this way. (This is the most common rookie mistake I see, along with not working enough with layers.)
Good use of layers and brushwork will get you good results very quickly, but there's more tools to look at to go further:
Color-correction: Curves is the single most powerful tool to learn to adjust colors, contrast, and overall lighting appearance. Curves are considered an advanced technique, but worth learning. Otherwise, you're splitting your time across multiple tools.
Filters: Blurring edges of brushwork can help them fit more seamlessly into the original. The unsharpen filter is actually a sharpening tool and more powerful than the default filter. "Dust and scratches" won't get you very far, as the crazing going on in your photo is very sharp compared to the details in the photo itself. Adding a grain texture is a way to help blend in all your final effects.
Masks & Clipping Groups: Masks provide another way of feathering your brushwork into the original photo. Clipping groups constrain the borders of a layer by that of its parent layer. Another advanced technique, but amazing in that they allow you to do more "non-destructive" editing of your layers. (I.e., types of edits that are easy to tweak/undo many session later.)
My general process would be to:
1) Color-correct the photo. You mainly want to see if you can pull up any details in the dark areas.
2) Use various brush tools to fix the crazing, red-eye, etc.
3) Use blur, unsharpen, and masks to better blend the brushwork.
4) Tweak color-correction a bit more, perhaps using dodge/burn tools selectively to help bring out detail. I sometimes create a new working layer that merges all previous layers (but still retain all the old layers underneath).
5) Create a new layer that merges all changes. Selectively sharpen areas of the photo and maybe use a slight overall grain filter to get a consist look to the final piece.
6) Tweak colors one more time for print, as printers may print darker than you expect.
Luckily, your photo has no major tears, so you don't need to do anything crazy like reconstruct faces. Just a lot of crack repair. A steady hand and patience will get you pretty far. The rest is getting comfortable with the assortment of techniques at your disposal. The great thing about having scanned your photo is that you can take several stabs at retouching the photo, each time you feel you've increased in skill.
If learning Photoshop is not in your future, I suggest getting the best quality scan of this as possible for future restoration possibilities.
posted by Wossname at 9:50 PM on July 16, 2012 [3 favorites]
It doesn't look like there's a whole lot of detail in the original photo but I think you should make a better scan. There a green color tint to the shadow areas that's probably not there in real life. A lossless, non-jpeg version would also give you more wiggle room while editing.
posted by The Lamplighter at 10:04 PM on July 16, 2012 [1 favorite]
posted by The Lamplighter at 10:04 PM on July 16, 2012 [1 favorite]
I'm with cairdeas on the Reddit idea. It's one of the few things they do well, and the results have been pretty outstanding.
posted by zombieflanders at 8:14 AM on July 17, 2012
posted by zombieflanders at 8:14 AM on July 17, 2012
This thread is closed to new comments.
posted by zadcat at 8:51 PM on July 16, 2012