Constructing Vegetable Beds
March 17, 2006 11:22 AM Subscribe
Constructing vegetable beds for a community garden: I have no idea what I'm doing. Can any carpenters out there give me feedback on the designs of our current beds (see more inside), insights into alternative and cheaper-to-construct designs, or point me to resources that will teach me a bit more about carpentry so I can figure this stuff out myself?
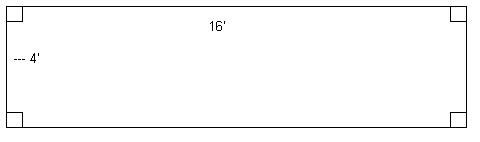
I'm in the process of getting some new vegetable beds built for a community garden. They're set into the ground, 12'x4'x16'. I'll be using pressure-treated lumber (cedar's way too expensive). There are six beds already in the garden, constructed like this with 2'x4's in the corners as supports. Unfortunately, the weight of the soil has proved to be too much for them and they're now pulling apart at the corners and require reinforcement.
To prevent this from happening again, I'm thinking of building the new beds like this, with center boards to pull the sides together and treated plywood triangles at the edge to provide extra support. But there are still problems:
1) Cutting the plywood will be time-consuming and we probably don't have the tools.
2) The extra materials required make the beds significantly more expensive to build, and we're on a half-a-shoestring budget.
3) Tilling would be more difficult with the bed broken up into three parts.
So, does anyone have any ideas on how to improve the design? Possible alternatives to the plywood corner bracing? Clever tricks that might eliminate the need for the center boards and thus reduce the cost? Experience with building raised vegetable beds? The vegetable beds must all be rectangular raised wooden beds, so mounded beds are out.
Thank you for your help!
But, as I reread your question, I see that the problem isn't with bowing, but with the corners coming apart. sigh
If that's the case, I think you can buy some of those metal fence brackets at a hardware store and use them to hold your corners together. Do you know the ones I mean? Something like this but appropriate for your application.
posted by jdroth at 11:36 AM on March 17, 2006
If that's the case, I think you can buy some of those metal fence brackets at a hardware store and use them to hold your corners together. Do you know the ones I mean? Something like this but appropriate for your application.
posted by jdroth at 11:36 AM on March 17, 2006
I can't give you any advice on construction techniques, however, I would ask you to reconsider using pressure-treated lumber for this. Pressure-treated lumber is impregnated with arsenic - that's what makes it resistant to insects. However, over time, that arsenic will leach out of the wood, and into the surrounding soil. Eventually, it'll end up in the vegetables you're growing. Needless to say, that is a bad thing.
posted by deadmessenger at 11:46 AM on March 17, 2006
posted by deadmessenger at 11:46 AM on March 17, 2006
You could use angle brackets on the corners, on the outside, if possible. At less than $25 for a hundred, you'd probably save money, and certainly trouble, over plywood.
I wouldn't worry about the tilling issue. Raised bed soil usually stays light and airy, and doesn't need tilling, just some hoeing.
You didn't ask, but I'd avoid treated lumber for raised beds, unless you're using ACQ Type D. CCA has some nasty stuff in it--the A is for arsenic. If you do use CCA, be sure to wear a dust mask while cutting, and wash (your body and your clothes) afterwards. We used Trex in our raised beds. More expensive, so it may not be an option, but it should last forever.
posted by MrMoonPie at 11:52 AM on March 17, 2006
I'm the only non-carpenter in my family but I'll add my two cents for what it's worth.
(1) forget plywood -- it's expensive and not suited for a box designed to hold a ton of high-moisture dirt.
(2) forget screws -- as the wood warps and splits, they will becomes less and less effective at holding the box together, no matter what kinds of supports you have. Use roof truss ties and heavy duty bolts to hold the box together. Then take truss mending plates and tack them onto the tops and bottoms of the sides. I'm pretty sure the lumber would fail before the joints with those measures. It shouldn't be more than $25 dollars a box.
(3) trex is worth its weight in gold.
Good luck
posted by mrmojoflying at 12:00 PM on March 17, 2006
I'll be using pressure-treated lumber (cedar's way too expensive).
Poison, Will Robinson! Poison!
I think you're heading for Various Bad Things, including exposure to one helluva liability lawsuit.
posted by five fresh fish at 12:03 PM on March 17, 2006
Poison, Will Robinson! Poison!
I think you're heading for Various Bad Things, including exposure to one helluva liability lawsuit.
posted by five fresh fish at 12:03 PM on March 17, 2006
Also, go check out Lee Valley Tools and their selection of raised-bed hardware.
I think the concrete slab structure would be killer. I'll bet you can get a concrete plant to donate imperfects.
posted by five fresh fish at 12:05 PM on March 17, 2006
I think the concrete slab structure would be killer. I'll bet you can get a concrete plant to donate imperfects.
posted by five fresh fish at 12:05 PM on March 17, 2006
What mrmojoflying said.
Also, you might want to look into the treated wood thing a little closer. If I am not mistaken (at least here in Cananda) the wood is now treated with a copper solution (kinda green) and is no longer toxic. I believe that the industry swiched over to that a number of years ago.
Bolts (make sure that they are the non-rusting type) with nice big washers will hold over time... screws and nails, not so much.
posted by TheFeatheredMullet at 12:25 PM on March 17, 2006
You might also want to consider putting the posts on the outside so that the soil pushes the boards against the posts.
posted by zeoslap at 12:28 PM on March 17, 2006
posted by zeoslap at 12:28 PM on March 17, 2006
The ones i built long ago were like the first picture but we put the 4x4's on the outside of the frame. We set posts into the ground 18" and above 18" then the side boards were trapped between the 4x4's and the soil (no bolts). This had the advantage that when we went to re-dig the bed we could easily pull one side up and off (or more) to facilitate the adding of compost, rototilling etc.
This also worked well for us as we could use any wood for side panels and replace planks on the fly as needed. We were cheap, good wood for posts and crap planks for the sides.
Also please NO NO pressure treated wood in gardens, no railroad ties ether.
posted by blink_left at 12:32 PM on March 17, 2006
X X
-------
Y| |Y
| |
| |
| |
| |
Y| |Y
-------
X X
Something like that
posted by zeoslap at 12:33 PM on March 17, 2006
This month's Sunset Magazine has a great step-by-step on how to make some simple raised beds. I'm actually in the process of building four of them for my own backyard right now, using those plans from Sunset.
posted by mathowie at 12:40 PM on March 17, 2006
posted by mathowie at 12:40 PM on March 17, 2006
most pressure treated lumber no longer contains arsenic.
How permanent are these structures? Do you want to reuse them year after year? Do you need to be able to disassemble them for tilling or anything like that?
posted by cosmicbandito at 12:51 PM on March 17, 2006
How permanent are these structures? Do you want to reuse them year after year? Do you need to be able to disassemble them for tilling or anything like that?
posted by cosmicbandito at 12:51 PM on March 17, 2006
deadmessenger writes "I can't give you any advice on construction techniques, however, I would ask you to reconsider using pressure-treated lumber for this. Pressure-treated lumber is impregnated with arsenic - that's what makes it resistant to insects."
Modern pressure treated lumber no longer contains arsenic, I still wouldn't built vegetable garden beds out of it despite all the claims of safety.
Take jdroth's advice. Shoring up the sides will help stop the corners from coming apart. I'd [1] place a 2X2 every 24-30 inches around the perimeter and at the corner (two per corner). You need twice as much stake sticking up as down. Regular construction grade SPF stakes will last several years if treated with BLO and they are fairly easy to replace. To preserve the beds give the wood a coat of boiled linseed oil (the type without metallic dryers if you can find it). Feed the cut ends until no more BLO will be absorbed. Stain the outside first if you want colour. Line the insides with heavy black landscape plastic. A couple screws into the stakes from the inside before you fill the beds will stop them from moving around.
For corner braces a 2X8 cut into triangular pieces will work a lot better. Any handsaw will do but the job will go really fast on a chop saw. Screw everything together with epoxy coated deck screws.
[1] Actually I'm using 3/4" black iron pipe because I can get it for free, it'll never rot off, and it is easier to drive into my heavy clay soil.
posted by Mitheral at 12:51 PM on March 17, 2006
Holy moly, but I didn't read closely enough, or I too would have made it clear that you should never use pressure-treated lumber in a food-producing garden. You've just got to deal with the rotting issues. All gardeners realize this, and we just deal with it. Use the cedar. The "way too expensive" is trivial compared with the risks.
posted by jdroth at 1:19 PM on March 17, 2006
posted by jdroth at 1:19 PM on March 17, 2006
Response by poster: We're going to have kids in the garden, which is why we've shied away from outside supports--less things for them to trip over when they're running through the beds.
We do hope to re-use these beds. The issue is balancing cost and longevity. I'd like to eventually build twelve more beds, but that's long off in the future. Right now I'm aiming for at least three more, but I only have about $700 to work with, and that includes topsoil, plants, tools, etc.
Thank you for all your tips on the pressure-treated lumber. It's something that bothered me when I came into this project (the six beds were already built), but the director said the woman before me had investigated pressure-treated lumber and it was OK. The standards had changed or something, so it was now safer to use.
I'm working on getting more grants, but for now it would be quite the battle to convince my director to use more expensive materials if I don't have concrete proof that the current pressure-treated lumber isn't fine for gardening.
If I used the angle brackets, would I still need the inner supports? That would significantly reduce the cost of each bed.
posted by Anonymous at 1:44 PM on March 17, 2006
Response by poster: (TheFeatheredMullet, the pressure-treated wood I bought to reinforce our fence was greenish--I think that's what you're talking about.)
posted by Anonymous at 1:46 PM on March 17, 2006
posted by Anonymous at 1:46 PM on March 17, 2006
Funny, I just completed putting together the raised bed for my vegetable garden. We only used 3" galvanized 10d nails and it's not coming apart, even after being filled with a lot of compost. Here is what it looked like before filling (the cement blocks were removed prior to filling it; those were there to hold down the hardware screen in place, which was put there to discourage burrowing animals). Here it is filled with dirt (since then I've filled it even more, and the sides aren't busting at all).
The wood I bought was non-pressure treated planks 2" deep, 12" high and cut into sections of 4' and 6', and then for the corner & middle supports I bought 2"x2" 8-footers, cut at the store into four 12" corner supports and one four-foot middle support. I built two 4'x6' beds. The wood was a little expensive, but it came out to $30 for each bed. On a side note, if anyone can tell me what kind of wood that is (I didn't ask and it wasn't listed), it'd be much appreciated. It was extremely tough to nail through - very hard.
Also, I highly recommend this book -- it's great, especially for beginners. In it, he details how to build raised beds and prepare the ground for vegetables. Lots of helpful info in that book. And PlanetNatural.com has a ton of gardening supplies you can't find very easily locally, such as copper tape for slugs, or neem insecticidal soap, etc. They have a section for OMRI products (products that are listed as ok to use in certified organic farming). Their prices seem lower than other sites I've checked.
Also, if you want to save a lot of money, you can check your local landfill for free compost. My local landfill has a huge compost pile that's totally free. I was weary of this, but a guy at a feed store (where local farmers go) told me that he grew the best tomatoes he's over grown in that compost, and that the feed store (which also sells seeds & starter plants) uses that compost for their plants. He recommended that to me over buying bags of it, and I hadn't even mentioned anything about a budget to him!
Also see Diynetwork's how-to on raised beds
posted by mojabunni at 2:15 PM on March 17, 2006
Treated Lumber + Gardens. Pretty much all you need to know, at least on first glance. Looks like the stuff is safe.
posted by five fresh fish at 2:36 PM on March 17, 2006
posted by five fresh fish at 2:36 PM on March 17, 2006
Since you're new to community gardens, here are some useful organizations you may not know about:
Green Guerillas is a useful source of info, advice, and guidance, especially regarding the oddities of urban horticulture. Here's their page on raised beds.
Just Food's City Farm works with community gardens to grow food for nearby schools, shelters, etc. Even if you're not in (or interested in) the program, they have lots of good info on growing veggies. (JF also organizes food-share programs with organic farmers near various cities -- worth checking out that part of the site, too.)
More generally, the Trust for Public Land is a national conservation org that's been enormously supportive of our NYC community garden. (TPL is more about fund-raising and sustaining support than GG or JF.)
Finally, my email's in my profile -- feel free to send a community-gardening SOS or WTF anytime.
posted by vetiver at 3:08 PM on March 17, 2006
The warnings about PT lumber are all worth taking seriously. even though most (not all) types of PT are now arsenic-free, the treatments are still designed to kill things. That includes you, and more significantly, children. A nasty organic compound will kill you differently than an organo-arsenide, but you still won't enjoy the experience.
If you want bug resistance, build in cedar.
posted by bonehead at 4:00 PM on March 17, 2006
If you want bug resistance, build in cedar.
posted by bonehead at 4:00 PM on March 17, 2006
Also, though it should be clear to anyone with a bit of sense, Keep railroad ties, old telephone poles or lumber treated with creosote away from food gardens. They are all pretty good sources of carcinogens. Ok for retaining walls, bad for veggies.
posted by bonehead at 4:03 PM on March 17, 2006
posted by bonehead at 4:03 PM on March 17, 2006
Just an aside on the new pressure treated lumber. The new chemicals cost more than the old stuff, so the outfits that do the treating are cutting corners. I started building a deck with pressure treated lumber from Lowes, and ended up sending back everything but the heavy posts. Those were ground contact rated and were pretty nearly green clear thru. The framing lumber was white inside and looked like the stuff was only brushed on.
Lowes tends to cater to homeowners. After we returned their garbage, we re-ordered from a building supplier and got the real thing.
posted by Huplescat at 5:28 PM on March 17, 2006
Lowes tends to cater to homeowners. After we returned their garbage, we re-ordered from a building supplier and got the real thing.
posted by Huplescat at 5:28 PM on March 17, 2006
The only worries I saw in the warnings about creosote railroad ties is that the plants will die where the touch the creosote, and nothing about it poisoning the garden.
I'm as surprised as y'all. Either the toxicity of treated planter boxes is an urban legend, or the timber industry has been SEOing Google.
posted by five fresh fish at 6:15 PM on March 17, 2006
I'm as surprised as y'all. Either the toxicity of treated planter boxes is an urban legend, or the timber industry has been SEOing Google.
posted by five fresh fish at 6:15 PM on March 17, 2006
I haven't built any raised beds, but have built my own fence. Some things to consider.
First, the vertical parts that come into contact with the ground will always be the part that will rot out first. The end grain of the posts is like a bunch of straws and will wick up moisture into the post and thus be prone to rotting. That is why the posts are almost always the first to really give out. For my fence, I used 2-3/8" galvanized steel posts used for hurricane fencing set into concrete. Ideally they will be some distance below frost line, but I live in California, so not an issue for me. If that is an issue for you, find out how deep to set them with a local expert. If you really want to make them strong, you can fill them with concrete as well. Dig a hole a few inches deeper than you want the posts to go, fill the bottom of the hole with gravel to the level you want the bottom of the posts to be. This makes it easy to get the posts to the same height. It will also allow the pipes to drain. Put the pipe in. Then fill the hole with concrete, making sure the posts are plumb in both directions. It will cost a little more at first, but they should last a very long time. Be sure to get cap for the posts, unless you fill them.
I was taught that wood under any sort of load, lots of heavy soil for example, should be braced every four feet or so. I would put a post every four feet. Wood will change size depending on humidity. As the seasons change, wood will move. This makes it hard to hold together with just fasteners. The beds will have to be structurally sound. The good news is you won't need the internal bracing.
You can get hardware that will join the metal posts to the side boards. I've seen ties for corners and straight runs. Both Lowes and Home Depot, or most good DIY stores, should carry the posts, the connectors, and the concrete. Look in the fencing section.
You can put the posts on the inside, but it will be much stronger if they are on the outside. The posts will take the weight, not the fasteners. Also, if you put the posts on the outside, you may only need connectors at the corners. If you use the metal posts, it should be safe for kids. These same posts are used in fencing at schools everywhere, so they can't be too dangerous.
I would build fewer beds better than many beds poorly. In the long run, you will not need to replace the same beds repeatedly. You might also call some fencing companies and see if they will give you a discount, have left overs, or cut offs that might work for you. Good luck.
posted by tbird at 1:15 AM on March 18, 2006
Creosote is a known human carcinogen. Most of the old railroaders from the bridge gangs ended up with skin cancer, although they were also exposed to a lot of sun with no protection. That said, today's sun has a hole in the ozone layer to peek though, so it's something to think about.
Be sure you know where the compost comes from. Do not use composted sewage sludge, it contains heavy metals. I didn't know that 20 years ago, and found out when the tomatoes had a funny, brown taste to them. (People either know what a brown taste is or they don't, if you don't ignore that part.) I just changed to flowers in that one bed but you wouldn't want to do that.
We used 4" x 6" timbers sometime back, I don't remember what they were treated with, but a 4' x 8' bed will rot into the ground without ever bowing out, and those are 2 timbers high. We just criss-crossed the corner timbers, drilled a hole down the joint, and dropped in the biggest bolt you could find at the hardware store, and they've held for 10 years nicely. (It takes two bolts per corner because of the short ends, hard to describe.)
Maybe you could run a center set across the bed at the half way mark, to pull the sides together? It would make a thing across the middle of the bed, but you could probably do it without stakes on the outside.
posted by unrepentanthippie at 7:13 AM on March 18, 2006
After thinking on this overnight I realized the I had the dimensions wrong. I thought the OP wanted a four foot high bed. That seemed too high, but if that is what was wanted.... OP put the dimensions at "12'x4'x16'" Upon further review, I realized the actual dimensions are 12 inches x4'x16'.
In that case I would just get a tamper and compact the dirt around the posts and not use concrete at all. I would still put gravel at the bottom of the hole for drainage. Two feet below grade and one foot above grade should be plenty unless you are in a really cold climate. You can get tampers at the DIY stores as well. I got mine at Lowes. It looks like a steel spear, maybe 6 feet long and about an inch or so in diameter. It has a point at one end, useful for prying up rocks and a flat disc about two inches in diameter for tamping. About $20 or so. Very useful tool for playing in dirt.
I shop at the blue and orange store frequently and have a pretty good idea of current prices. You should be able to get a good set of the tools you will need for about $100: Post hole digger, tamper, 4 foot or so level, shovel, hack saw (or even better a pipe cutter) for the piping, file for deburring pipe cuts. If you take care of the tools, they should last for a very long time. The big expense would be a circular saw, but see if you can borrow one. Someone is bound to have one you can use. If not, most stores will give you two cuts for free and then charge about fifty cents for each additional cut. For the piping, if you go to a fencing supplier, you might be able to talk them into cutting the pipe for you.
For the wood I would use redwood. It will be safe to use. It will not be nearly as expensive as ceder and should have a similar lifespan. I don't think it would be that much more expensive than pressure treated, but I would have to check. My guess is you could get enough lumber for about $100 to $125 per bed. Prices can vary considerably so call around and see if you can get a discount or at least a good price. . Posts and hardware for 10 posts should be $50 to $75. That doesn't leave much for dirt and plants, depending on the actual costs. However, the cost of the bed will be pro-rated over many years. The soil will be worked and supplimented every year and the plants can be replaced as well.
posted by tbird at 1:31 PM on March 18, 2006
For the wood I would use redwood. It will be safe to use. It will not be nearly as expensive as ceder and should have a similar lifespan. I don't think it would be that much more expensive than pressure treated, but I would have to check.
Eegads man, inch thick redwood is about $5.00 a board foot when ordering in wholesale quantities. Red cedar is actually less expensive by a bit, and white cedar about 1/2 as expensive. Pressure treated is 1/4 the cost of redwood.
This isn't an engineering or design expo project. This is a community project with a total budget of $700 where I'm sure cost is the second most immediate concern after functionality/durability.
The OP need to use rough construction grade yellow or white pine 2"X12"s and assemble them with trussing hardware, which is cheap and designed to tie large pieces of wood together under very heavy loads. This will eliminate the problems he was having with using screws, which are not the right fastners for the job.
If he needs more support, all he has to do is go to the junkyard and buy a few old pieces of 3/4in rebar or 1in piping and stake in the sides - no digging, no concrete, nothing. This will give him the cheapest beds that will hold together for 10-15 years. Plus, with this construction they can be disassembled undamaged with a claw hammer and large wrench to replace a piece of defective lumber if need be.
posted by mrmojoflying at 2:01 PM on March 18, 2006
"Eegads man, inch thick redwood is about $5.00 a board foot when ordering in wholesale quantities."
Before I posted, I made a quick call to Lowes and Home Depot and priced out a 2” x 12” x 12’ piece of redwood at about $39. Neither had 16’ long pieces. That works out to about $3.25 per linear foot. Multiply that by 40 linear feet, and I get $130. I suspect with some phone calls or finding the best size/price ratio, $100.00 to $125.00 is a good guess. This is on the west coast. I think the OP is on the east coast. It may cost more there. If redwood is costing $5.00 a board foot, it had better be pretty good stuff. B or better 4/4 red oak goes for about $3.00 a board foot around here, if you shop around.
Pine would not be a good idea. It won’t last the way redwood or cedar does. Yes, pressure treated is a way to go. I have not priced it out recently, but as I recall from when I priced it out last, it was pretty close in price to redwood. I could be wrong. I, personally, would not want to eat vegetables from anything grown around pressure treated lumber.
As for connectors, the hardware I was talking about is in the same section as construction hardware. HD keeps the parts in both fencing and construction hardware. Trussing hardware is designed to hold lumber in place so the lumber can take the weight. That is how it can be so thin. If the design makes the hardware fight the weight of the soil, it will fail sooner than if the weight goes directly to the posts. As for costs, I think the connectors were about $3 or $4 bucks for the corners and $2 or $3 for the straights. and posts should be about a buck a feet for $3 per post. It's been about two years since I built my fence, so I am not positive about those costs. Repalceing the boards would be easy. Just unscrew the old wood, replace it, and put in new screws.
You offer another way to go. It would be cheaper, but likely would not last as long because rebar isn’t galvanized and the pipes would not be connected to the wood. Still, I agree with your estimate of the life span of the bed. I would be concerned about kids running into exposed rebar or 1 inch pipe. The stuff I was writing about is used in playgrounds , so it should be safe if it has the rounded cap on it. A lot depends on how long they want to keep the beds. I have rarely regretted over-building but have definetely regretted under-building.
posted by tbird at 9:15 PM on March 18, 2006
This thread is closed to new comments.
posted by jdroth at 11:33 AM on March 17, 2006