How did they do it without InDesign?
June 8, 2011 12:04 PM Subscribe
How did basic design work (say, for advertising posters) happen in the analog days? Can I still do it that way today?
A student club I was involved with in college had a collection of beautiful posters from the '60s-'80s that were made on a small scale (to advertise events on campus) but that were still very put-together looking, way more beautiful than anything we were capable of when I was there. I suspect these things were made by either silkscreening or playing around with copy machines (or both?) - but I don't know for sure.
I also see things like the liner notes for the Anthology of American Folk Music, but I have no idea how they were laid out (especially the typesetting - a typewriter with a bunch of different fonts?)
Help me make beautiful things that don't have "computer" written all over them!
(Perhaps the answer is just to get better at using InDesign. If you have any pointers on bringing together analog style with digital tools, that would be fantastic too).
The text components of the poster could be supplied already typeset by a typesetter or could be mocked up using Letraset, which consisted of sheets of plastic with letters in different fonts an sizes that could be transferred onto paper. With a knife they'd cut it up the bits of text however they wanted to. They'd apply rubber cement and stick it onto a board that represented the whole poster. Photos would be handled the same way. They'd stick and un-stick the little pieces of paper trying different arrangements, slicing them, etc. They'd use rulers of different types to keep things aligned as they arranged them. There were tools for helping to manipulate the little sticky paper components, e.g., handheld rollers for pressing down bits of paper and making sure they stick. When the arrangements satisfied them, they'd take their mockup to the typesetter. Not sure what happenned at that point.
posted by Paquda at 12:21 PM on June 8, 2011
posted by Paquda at 12:21 PM on June 8, 2011
There's a number of different technologies that you should look at to get an idea of the history of design work and typesetting. I don't have time to write up a long answer, but here's a few things that should get you started.
For the type itself, you've got letterpress, in which metal type is arranged in a tray, inked, and then printed onto paper. Letterpress is still quite popular for invitations, business cards, and posters. There's not other way to get the same physical impression of letters into the paper. The next revolution was Linotype, which basically speeds up the process of arranging the type on the tray, to my understanding. These techniques are only useful for fairly large runs (or small runs with large budgets) since there's a lot of setup cost.
For smaller projects, you'd use different techniques. When my dad was a design student in the 70's, he used a lot of dry-transfer lettering. Basically, you get a big sheet with letters printed on it. You can lay that sheet over your paper (probably smooth bristol board) and use a burnisher to rub the type down onto the paper. Kerning and tracking are entirely up to you. Your type choices were limited to the dry-transfer you could buy. You'd then draw on any layout elements you want, and copy the finished product. I don't think there's anybody still making professional-quality dry-transfer type anymore, but you can get similar products in the scrap-booking section of a craft store.
Screenprinting is also definitely a good way to design posters and such, and is something that's still very much accessible to you. You can either draw a design onto a screen by hand, or you can use photo emulsion. It lets you print out a design onto a transparency or cut things out of paper, then place them over the screen and expose it to light. The parts of the emulsion that are exposed to light will set, and then you rinse out the rest.
If you can find a good family-owned art store (especially if you can find someone working there who's over about 50) you can probably discuss a lot of these techniques with someone who's actually done them, and may even still be able to get access to a lot of supplies. The store I used to work in still had cabinets full of dry-transfer lettering, rubylith, and all sorts of other obsolete art supplies stashed in the back room.
posted by duien at 12:27 PM on June 8, 2011 [1 favorite]
You know the "cut" and "paste" functions of your computer? Once upon a time those were literal, not metaphorical.
That said, you can still find a lot of artisans who do cool letterpress work that harkens back to the day.
posted by aught at 12:39 PM on June 8, 2011 [1 favorite]
That said, you can still find a lot of artisans who do cool letterpress work that harkens back to the day.
posted by aught at 12:39 PM on June 8, 2011 [1 favorite]
I used to do this stuff back in the day. We used a crapload of rubber cement, plus yes, Letraset (rub-on letters.) Also, a sharp Exacto knife came in handy.
If you need more tips, I have access to a lot of my old artschool friends on Facebook-if you have specific questions I can pass them along. We were all in art school about the time they were THINKING about adding one computer course-and now they have a major in computer animation!
posted by St. Alia of the Bunnies at 12:48 PM on June 8, 2011 [1 favorite]
Response by poster: What is/was the best way to get things from the "paste up" phase to the "able to be printed on a mass scale" phase?
These days, scanning it would probably work alright, as long as it was on small enough paper or as long as you have access to a big enough scanner (though I guess you'd need to clean things up digitally somewhat regardless).
What did they do back then? The "paste up" article DarlingBri links to mentions photographing them to make a printing plate. Would that have been done even if you were doing something on a small scale (like my college club's campus posters)?
posted by bubukaba at 12:57 PM on June 8, 2011
They used to hang up your finished boards in front of a big ol' camera, and then use that negative to etch a printing plate. If you want multiple colors, they hack up that negative onto several large sheets and then use those to expose that various plates for each spot color. (Four-color job required shooting your item four times, with color filters.)
I worked in a service bureau in the 1990s where we had people still manually stripping together film -- but I also did layout for a college paper where we used hot-waxed paper and boards.
posted by wenestvedt at 1:32 PM on June 8, 2011 [1 favorite]
I worked in a service bureau in the 1990s where we had people still manually stripping together film -- but I also did layout for a college paper where we used hot-waxed paper and boards.
posted by wenestvedt at 1:32 PM on June 8, 2011 [1 favorite]
"photographing to get a printer's plate" is a camera on a stick, more or less -- our company no longer does microfilming, we do digital, but we have a "planetary camera" set up with a Canon Rebel Xsi gerry-rigged in the place of the film camera. Photograhers call them "enlarging stands". I learned to use a small offset press in high school, and the setup was pretty much the same, except instead of photographing onto 16mm or 35mm, we were photographing onto 1x full-sized negatives. If you were to do a paste-up, and then photograph it on a suitably-lit enlarging/duplication stand, you would effectively get a digital version of what you'd have gotten back in the analog days.
When you photographed for a printer's plate, you didn't leave excess around the edges if possible. Since you're trying to print many of the same thing, you'd do a 4-up or 8-up or as many duplicates on a single sheet as you could fit. Then you'd only print 1/4 or 1/8 as many sheets of paper and cut them apart.
posted by AzraelBrown at 1:33 PM on June 8, 2011 [1 favorite]
What is/was the best way to get things from the "paste up" phase to the "able to be printed on a mass scale" phase?
First, you get one of these...
posted by Thorzdad at 2:25 PM on June 8, 2011 [1 favorite]
First, you get one of these...
posted by Thorzdad at 2:25 PM on June 8, 2011 [1 favorite]
As darlingbri and st. alia say, back in the dark ages, way back before "cut and paste" was a computer term, the 'cutting' part was done with an exacto knife, and the 'paste' part was done with either rubber cement or pastewax.
The pastewax was kept melted & liquid in a heat-producing contraption called, creatively enough, a waxer: you'd run whatever you needed to paste down through some rollers to transfer the wax to the back of your item, then stick it down on 'boards', which were similar to thinnish lined/graphed poster board. When cool, the pastewax would remain flexible; and if you needed to move your pasted item around, just peel it up and re-stick it.
Other than occasionally slicing and/or stabbing yourself with the exacto blades, or burning yourself with either the hot metal waxer or the liquified pastewax (imagine the burn you'd get from sloshing candle wax on your hand, only worse!), it was actually kinda fun.
posted by easily confused at 3:02 PM on June 8, 2011 [1 favorite]
a little clarification:
Would that have been done even if you were doing something on a small scale (like my college club's campus posters)?
design/printing really didn't happen on much of a small scale until the mimeograph and xerox machines happened. before those two machines, you needed a pal who was a printer or a silkscreener.
before instant printing, you could technically do it, but a lot of printers wouldn't allow less than X quantity of anything, because below a certain volume multiples don't make up for the cost of setup and makeready.
posted by patricking at 3:10 PM on June 8, 2011 [1 favorite]
bubukaba, were I replicating the analog process today with digital tools, I'd take my paste up, put it on an enlarging stand/white box, and shoot it digital. I'd do no processing (to keep it authentic) but crop for bleed and print to A2. That would get you your mini posters.
posted by DarlingBri at 3:22 PM on June 8, 2011
posted by DarlingBri at 3:22 PM on June 8, 2011
I used to edit/co-publish a music mag back in the day where we did pretty much every by hand by which I mean ...
- it starts with paste-up where you organize your various text and images into individual pages, then you take these pages to a print shop which will prep them for off-set printing, which, as far as I can tell, is still pretty much the same process as in pre-digital days.
The challenge at the creative end is stuff like where you get your "characters" from, what fonts will you use, how will you get them to size without doing everything by hand? (hint: photocopiers are pretty good for this).
And then there's screen-printing or silk-screening, which can be quite beautiful, and fun.
posted by philip-random at 3:22 PM on June 8, 2011
There are a few DIY screen printing things on instructables. I'm sure none of them are going to be perfect and accurate - but for big bold designs the limitations of something DIY might be what you are after?
posted by pmcp at 3:24 PM on June 8, 2011 [1 favorite]
posted by pmcp at 3:24 PM on June 8, 2011 [1 favorite]
also, alot of illustration work was done by hand in india ink on poster board, maybe glue some fancy type around, or maybe do your fancy lettering also by hand, then throw into aforementioned stat camera which would then be converted to offset plate.
posted by Rube R. Nekker at 4:02 PM on June 8, 2011 [1 favorite]
posted by Rube R. Nekker at 4:02 PM on June 8, 2011 [1 favorite]
Letraset is still available if you want it. It is still sometimes used for things like museum labels (that I know of) and the like.
I remember my father using it - with a font that consisted of very different things to what you would normally see - for PCB design in electronics. You certainly don't see that anymore.
posted by deadwax at 12:31 AM on June 9, 2011
I remember my father using it - with a font that consisted of very different things to what you would normally see - for PCB design in electronics. You certainly don't see that anymore.
posted by deadwax at 12:31 AM on June 9, 2011
Letraset was drag if you were a poor student and had to buy a fresh sheet, when all you needed was another "e".
posted by bonobothegreat at 8:13 AM on June 9, 2011 [2 favorites]
posted by bonobothegreat at 8:13 AM on June 9, 2011 [2 favorites]
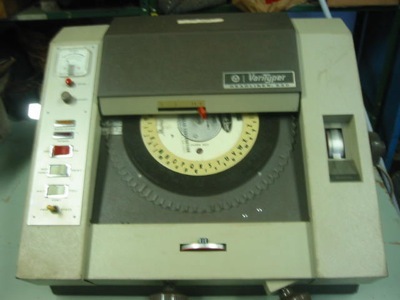
Letraset was only one way of getting letters and probably not the most efficient. In High School and Technical College we used these Photo-Mechanical typesetting machines. There were different discs with a huge number of fonts. It would output a headline onto printing out paper which developed and pasted onto your mechanical layout.
posted by JJ86 at 8:40 AM on June 9, 2011
posted by JJ86 at 8:40 AM on June 9, 2011
The quality was never excellent but it was common to reproduce things like student newspapers, classroom tests, handbills or small single-colour posters with a mimeograph. Your pasted up original went into a machine that did a progressive "scan" and burned tiny little holes in a thin plastic sheet to create a stencil. The finished stencil was mounted on a drum that forced ink through the tiny holes as you cranked out copies onto letter or legal sized paper. It could be a messy procedure.
The fresh copies had a very distinctive smell.
posted by bonobothegreat at 11:26 AM on June 9, 2011 [1 favorite]
The fresh copies had a very distinctive smell.
posted by bonobothegreat at 11:26 AM on June 9, 2011 [1 favorite]
This thread is closed to new comments.
posted by DarlingBri at 12:20 PM on June 8, 2011 [8 favorites]