what is wrong with my dryer?
September 11, 2009 6:11 PM Subscribe
kenmore clothes dryer help: my wife and i recently purchased a home that came with a kenmore washer and dryer. at the time of the house inspection, the dryer was working fine. we have tried to use it since moving in and it no longer functions. any ideas what could be wrong?
...when we turn the dial and press start, the dial moves as if it is drying a load. however, the drum inside does not spin and the unit does not heat up. the little light inside it does turn on when we open the dryer door, which makes me think that it is not an issue with the power or breaker. but can it be? or can anybody suggest what could be wrong?
if anybody has any recommendations for a repair-person in the richmond/vancouver BC area, i'd also appreciate that!
thanks all!
I had a Kenmore dryer which a neighbor had set out for garbage, I took it in for repair and the door switch needed to be replaced. It was a ~$20 part & the repair man said it was common for them to fail.
posted by torquemaniac at 6:42 PM on September 11, 2009
posted by torquemaniac at 6:42 PM on September 11, 2009
Electric, I think. Check the breakers. There are possibly 2 breakers that are ganged
together (joined so that if one opens, the other one does too), and it sounds like of
them is off.
Snap the breakers to off, and the firmly back on again, and try to use the dryer again.
Electric dryers usually use 220 volts for the heater element, and 110 for the light and
the timer motor. I'm guessing that your dryer has a 220 volt drum motor. If one leg of the
power is off, then 110 will be available for the light and timer, but no power will be
available for the drum motor and heater element.
posted by the Real Dan at 6:43 PM on September 11, 2009
My dryer drum is belt-driven, and when the belt broke, obviously, it stopped spinning. Do you hear any motor sounds inside as if something is trying to drive a belt, but there's nothing connected?
posted by misterbrandt at 6:46 PM on September 11, 2009
posted by misterbrandt at 6:46 PM on September 11, 2009
Dryers that I've worked on seem to have a collection of safety features designed to prevent them from running if something isn't right.
The simplest is the door switch. You've said the light comes on with the door open. Are you sure it turns off again with the door shut? If the light doesn't go off, the switch isn't working, and it won't run because it thinks the door is open.
Another I've seen at least once is a switch that is held in the on position by drive belt tension on a roller. If the belt is broken or not engaged on this roller, the motor doesn't run.
Some have a thermal fuse that cuts off power to the motor if the motor has overheated. This has to be replaced if it's blown.
The motor itself tends to have some sort of centrifugal switch in it, so if the motor is not running, the power to the heater is also disconnected. The safety devices protecting the heater (a couple of thermostats plus a fuse) usually just disconnect the heater and leave the motor running. So this sounds like something in the motor circuit is the problem. Or maybe even the start button or timer itself.
Could it be some problem with the power to the dryer? I don't think it's likely because in all the ones I've opened up, only the heater was fed with 240V from both hot wires. Everything else was connected between one hot wire and neutral since the timer, light, and motor all work on 120V. So if there's a power problem, either nothing would work, or everything but the heater would work.
posted by FishBike at 6:54 PM on September 11, 2009
Did you get a dryer manual with the house? Can you google one up for your model? They will often have a "troubleshooting" section at the back with solutions to the most common issues (starting with "is it plugged in" and ending with who-knows-what)
posted by misterbrandt at 6:59 PM on September 11, 2009
posted by misterbrandt at 6:59 PM on September 11, 2009
A good forum for posting this kind of thing is the Samurai Appliance Repairman. If you can get past the awful shtick, the guy is very, very knowledgeable.
posted by mmascolino at 7:14 PM on September 11, 2009
posted by mmascolino at 7:14 PM on September 11, 2009
I had a dryer that would not get the clothes dry. Turned out that the end of the link exhaust had caked up lint against the screen to the outside. Once I removed that lint she was working like a charm. If it is the motor, this will not help.
posted by JohnnyGunn at 7:44 PM on September 11, 2009
posted by JohnnyGunn at 7:44 PM on September 11, 2009
If it's a gas dryer, the pilot light may have been turned off if the gas was shut off as part of the house transition.
posted by jenkinsEar at 8:35 PM on September 11, 2009
posted by jenkinsEar at 8:35 PM on September 11, 2009
I used to sell these things at a hardware store.
One thing to consider is that the higher-end models often have circuit boards inside to control major functions. I have heard of many washers and dryers rendered inoperative by bad control boards.
The suggestions by others are good, and you should definitely look into those possibilities. If it does turn out to be the control board, you can't really fix it yourself.
posted by twblalock at 11:20 PM on September 11, 2009
I had a dryer that stopped when it overheated ( I tried to dry something too big that got stuck)....Asko's manufacturers in all their wisdom neglected to show where the reset button was in the manual . Mine was a black rubber button in the back.
posted by brujita at 11:55 PM on September 11, 2009
posted by brujita at 11:55 PM on September 11, 2009
I also have a Kenmore clothes dryer, electric; the drum has stopped turning, but it gets hot and you hear a motor noise, just as misterbrandt suggested.
So it sounds like the belt may have snapped. Is that something I can replace myself? Any how to's?
posted by msalt at 6:21 PM on June 6, 2010
So it sounds like the belt may have snapped. Is that something I can replace myself? Any how to's?
posted by msalt at 6:21 PM on June 6, 2010
Update: that site mentioned above (fixitnow.com) is excellent, and with its help I got the top off and found that indeed the drum belt is broken (looks melted, actually, at the break point.)
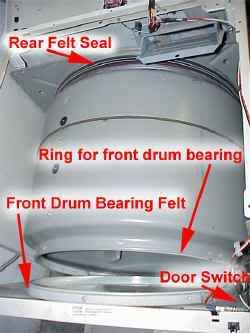
For those doing this in the future; what I first thought was the drum belt was in fact the rear felt seal, as you can see in this picture. The drum belt is the unlabeled thin one in the middle.
I'll pick up a replacement tomorrow, at Sears or W. L. May (for those in Portland, Seattle, Boise or Sacramento, it's an excellent appliance parts store.)
My remaining question is; how difficult is it to rethread the new belt? Does anyone have any tips? The Samurai repair site has some good diagrams but didn't talk about lowering the drum down into place with the belt in sync, which I have found difficult in related belt repairs.
Thanks,
posted by msalt at 7:13 PM on June 6, 2010
My remaining question is; how difficult is it to rethread the new belt? Does anyone have any tips?
I suspect this ought to be a whole new question, but, I recently had to replace the belt on my Kenmore dryer too. Installing the new belt was, indeed, the fiddly part of the job. Here's how it went with mine, hopefully yours is similar:
The drum should remain installed on the back wall of the dryer. You'll have to remove the front panel of the dryer if you haven't already. Prop up the drum with some old books or boxes or whatever you have handy. Put the new belt onto the drum with the grooved rubber side touching the drum (you'll have to briefly lift the drum off your temporary supports while you do this to get the belt past them). The belt will be quite slack at this point. There's probably some worn-off paint on the drum surface or a black mark from the previous belt to indicate where the new one should go. Just get it approximately right and it'll sort itself out.
Now for the fun part. There is a tensioner assembly, which is a little idler wheel on a metal bracket. It's held in place by belt tension, so when the belt breaks it falls out and you have no idea where it came from. Yay! Also the bracket wraps around both sides of the pulley, making it apparently impossible to get the belt on around the wheel.
There should be a slot and a couple of little holes on the bottom of the dryer, near the motor. The tensioner assembly fits into the slot and has a couple of little teeth that go into the holes. You can try and fit it there to make sure it's the right place, just remember it'll fall out again without the belt holding it in place. Notice, though, if you try to lift up on the wheel, the assembly stays in place. This is the key to the whole fiasco.
What you have to do is hold the bracket in place with one hand, and with the other hand grab the belt and pinch it so you have a U-shaped loop of belt. Stuff that loop underneath the idler wheel (e.g. right through the tensioner bracket that holds the wheel) and then hook that loop of belt around the motor shaft. The belt tension should now be holding the tensioner assembly in place--it actually tries to lever it upward if I remember right. I think I ended up using a ratchet wrench handle inserted through the loop of belt to be able to get enough tension on it to get it over the motor shaft.
You can now remove your supports and re-install the front of the dryer. Try turning the drum by hand to make sure the belt isn't rubbing on anything. Belt alignment is not critical because as long as it's on the motor shaft correctly it'll align itself in a couple of revolutions of the drum. If everything seems OK turning it by hand, put the rest of the dryer back together and fire it up. If it's anything like mine, you'll notice that squeaking sound it has been making for the last year is gone.
posted by FishBike at 5:33 AM on June 7, 2010
Awesome, thank you so much. If it was my question, I'd mark your answer the best 5 times.
posted by msalt at 4:16 PM on June 7, 2010
posted by msalt at 4:16 PM on June 7, 2010
OK, a complication arose, naturally, as I will illustrate. When I opened up the dryer, and looked at the motorworks, I found (in addition to a dust carpet and $5.03 in loose change) this a melted round piece of plastic ( here's its other side.)
Obviously I need to get that replaced as well. Does that go inside that tension thingy? It looks just about the right size to fit inside that smooth rounded part.
posted by msalt at 8:58 PM on June 7, 2010
Obviously I need to get that replaced as well. Does that go inside that tension thingy? It looks just about the right size to fit inside that smooth rounded part.
posted by msalt at 8:58 PM on June 7, 2010
I believe you're correct, msalt, in which case you'll need a new tensioner assembly. There is no way to replace just the wheel part, since the wheel is installed as part of making the whole assembly.
I've never seen a tensioner that wasn't supposed to have a wheel on it, and that looks like the right type of wheel for it. The only other wheels are the drum rollers that the back of the drum sits on top of, and those usually have a sort of tire on them. If you can see those are still intact, then that confirms this melted wheel came off the tensioner assembly for sure.
posted by FishBike at 6:33 AM on June 8, 2010
Yay! Awesome advice, it works (apparently) fine now. Thanks so much.
Here are some additional observations for future fixers:
1) When I put in the tensioner assembly, it looked like I had the wrong shape -- like it needed to go straight up much more but went to the left instead. Don't fret -- it has lots of give and when I followed FishBike's instructions, it fell into place.
2) Kenmore/Whirlpool have changed the tensioner's they use. The one in that picture has changed to part 341241, one fixed wheel inside the metal just as described.
3) When I read the instructions above, it didn't gel in my mind. Trust them. When you've got it all in your hand, it all makes sense, pulling the loop of belt through the metal and all.
4) I was actually able to get belt over the motorworks by hand, without a socket handle, just by lifting the drum up a bit. I had to bring it back down carefully and adjust it a bit afterward though.
5) When you take off the front cover of the dryer in the first place, be sure to carefully unplug the crimped plastic electrical connectors that connects the door switch to the main part of the dryer -- do that before you even unscrew the front panel. I tried to just carefully pivot the dryer front and lay it on my washer, and it fell and pulled those wires clean out of their crimped connector.
posted by msalt at 8:56 PM on June 9, 2010
This thread is closed to new comments.
posted by zippy at 6:18 PM on September 11, 2009