Tools for removing the notebook lines from scanned docs
April 8, 2004 11:30 PM Subscribe
Has someone come up with a tool for removing notebook lines from scanned documents?
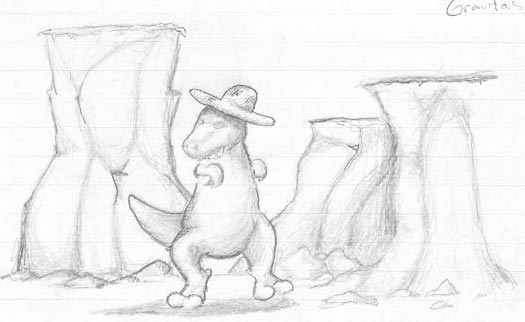
Invariably, the only time I eversketch doodle anything worth keeping is when it's on notebook paper, in class, when I'm supposed to be taking notes. If I want to keep it permanently, I have to scan it in, but then I end up with these blue and red (college-ruled!) lines through my picture of a dinosaur wearing a sombrero (or what have you) that I would like to get rid of.
Without having to go into photoshop and find the right color to replace each pixel with, is there anything I can do to clean up these images? Has somebody made a filter for this?
Invariably, the only time I ever
Without having to go into photoshop and find the right color to replace each pixel with, is there anything I can do to clean up these images? Has somebody made a filter for this?
I'm not aware of any, but since the sketches are impromptu, would I be right in assuming that you're using a single color of ink or pencil?
If that's the case, it might be easy to set up a PhotoShop action that would automatically select and delete the specific colors of the lines.
If you can post one of the scans somewhere, I can see what I can do.
posted by willnot at 11:56 PM on April 8, 2004
If that's the case, it might be easy to set up a PhotoShop action that would automatically select and delete the specific colors of the lines.
If you can post one of the scans somewhere, I can see what I can do.
posted by willnot at 11:56 PM on April 8, 2004
Response by poster: Willnot -- I tried using the wand selector, but of course the areas that are covered with graphite are different colors than the areas that aren't.. I had no luck. I have no idea how to do photoshop actions, so that didn't get tried yet.
This is not something that really merits you putting in physical effort, since it's just a bunch of stupid doodles. It is nice of you to offer, though, and if you want to give it a shot, I uploaded it here... it's resized to be as small as I could make it, cause I thought jpeg compression might screw up whatever you were gonna do.
posted by Hildago at 12:12 AM on April 9, 2004
Response by poster: It's still like 240k, so be warned.
posted by Hildago at 12:12 AM on April 9, 2004
posted by Hildago at 12:12 AM on April 9, 2004
Wow, that's tough. Even if a filter exists, I doubt it will help you there. Your shading is just too close to the color of the blue lines. The levels histogram is like a vertical line. Even when I go into the individual channels, I can't find a way to select it that doesn't also grab a large chunk of your image.
You might be able to pull out more distinction by playing around with your scanner settings. Short of that though, it's the eraser tool for you I'm afraid.
posted by willnot at 12:55 AM on April 9, 2004
You might be able to pull out more distinction by playing around with your scanner settings. Short of that though, it's the eraser tool for you I'm afraid.
posted by willnot at 12:55 AM on April 9, 2004
It took about 30 seconds to get this in Photoshop
Here's how to do it. First use the eyedropper tool to select one of the blue lines. Then click on [Select]->[Color Range] and set the fuzziness to around 40, and hit ok. This highlights anything that is the same color as your foreground color. Then Shift-F5 to bring up the fill menu and fill in the selection with white. The blue lines should be mostly gone now. Do the same with the red line.
After that I adjusted the brightness and the contrast a bit to clean up the remnants of the lines. It's a little rough but playing with it more you could get better results.
Hope this helps.
posted by Tenuki at 1:05 AM on April 9, 2004
I would try the clone stamp for those areas where the blue is under blue lines. or healing wand? have you tried the healing wand? other suggestions...
create a new layer grab the paintbrush tool, pick a nice tyrano color and set the brush opacity to about 30 or forty% then just color it all in! it will look real nice and not more blue lines.
suggestion two. get a sketchbook!
suggestion three. doodle smaller. make sure no doodle is larger than the distance between two blue lines. mabye landscapes?
good luck.
posted by darkpony at 1:09 AM on April 9, 2004
Whoa... unclear if this was more fun than sleep or not: Another go at it
But here are a few more ideas:
1) The lines are all purely vertical and horizontal. You can exploit this. The "Filter>Other>Custom" tool can be useful here... well, once you figure out how it works.
2) Dust & Scratches works decently on the lines. But then you need to do something else to get the detail in the other parts back and add it in.
I think I made two layer copies of the original. On the top layer, I used a custom filter (no clue of the exact numbers) that dropped the lines but kept a lot of the detail (minus shading); on the bottom layer, I used Dust & Scratches to drop the lines and detail but keep shading. I set the blending of the top layer to color burn. I tweaked the levels a bit, too. It ends up looking like a completely different style than what you drew, but hey...
And yes, that's more involved than might be worthwhile, but it was a learning experience for me. :-)
posted by whatnotever at 3:18 AM on April 9, 2004
Wow. Small world. I wrote a piece of research software to do that in 1989. It was designed as a preprocessor for reading music. If I had the source still, I'd send it, but it's long gone.
posted by plinth at 3:34 AM on April 9, 2004
posted by plinth at 3:34 AM on April 9, 2004
Hildago - have you ever seen the Far Side cartoon "Tyrannosauras Mex"? Your sketch reminded me of that. Pretty good drawing!
posted by vito90 at 5:46 AM on April 9, 2004
posted by vito90 at 5:46 AM on April 9, 2004
I second the photocopying technique. Grade school level work sheets are generally produced as only one sheet with both questions and answers, with the answers written in blue, such that when a teacher photocopies the worksheet for distribution the answers will have mysteriously disappeared.
posted by mmcg at 6:52 AM on April 9, 2004
posted by mmcg at 6:52 AM on April 9, 2004
Another way to do it... use the Hue/Saturation menu item in Photoshop. Change the hue selector to Blues or Cyans, and change the lightness to the minimum. (I don't have Photoshop here to try it, but it should work.)
posted by smackfu at 7:34 AM on April 9, 2004
posted by smackfu at 7:34 AM on April 9, 2004
When I want to do this, I just use select->color range and then select the graphite (which I want to keep) with an appropriate fuzziness (trial and error -- you can also select additional colors by using the "add" eyedropper in the color range menu) and then copy/paste it to a new layer over a white background.
You could also try choosing the red and blue channels (in the layers menu) and just upping the brightness/contrast on them. I don't have time to test now, but I'm sure between these and the above responses you'll find something that works for you.
Incidentally I have a stuffed tyranosaur on my very desk which I had fashioned a sombrero for at some point (working at a summer camp) and which I recently sketched for my art class (!).
posted by rafter at 9:00 AM on April 9, 2004
The problem is that the lines are very dark and exist in every colour channel. The best result I could get was by converting to CMYK, deleting everything but the yellow channel, and converting it to black. Even then, the lines aren't completely eliminated.
Also, I'm looking at some photocopied notes right now, and the blue lines are somewhat visible. Adjusting the contrast on the copier might get rid of them, but you'd lose a lot of your shading. Your best bet is to get some unlined paper.
posted by teg at 9:28 AM on April 9, 2004
Also, I'm looking at some photocopied notes right now, and the blue lines are somewhat visible. Adjusting the contrast on the copier might get rid of them, but you'd lose a lot of your shading. Your best bet is to get some unlined paper.
posted by teg at 9:28 AM on April 9, 2004
Response by poster: Wow, thanks for giving this so much thought, guys.
suggestion two. get a sketchbook!
I have several, but the problem is whenever I try to draw in the sketch book, I can't ever think of anything to draw. It may be performance anxiety at work. I always end up just drawing a tree or something.
suggestion three. doodle smaller. make sure no doodle is larger than the distance between two blue lines. mabye landscapes?
Brilliant! Other things I could draw include centipedes and scenes from the original Spy Hunter game! Barges!
Anyway, I'm going to go try some of these Photoshop suggestions. I'll post a link if I get it looking right. Thanks again everybody.
posted by Hildago at 10:48 AM on April 9, 2004
Thinking out loud: All the data is grey, so assuming RGB (something not everybody will love me for, but so be it), for a line that hasn't been pencilled over you need to add the appropriate R, G and B components so it makes white (you should probably adjust the image so the background really is white first). The darkening caused by drawing over the line is approximately equal to multiplying the RGB vector (the separate channels) by a value between 1.0 (not drawn over at all) and 0.0 (entirely black). So assuming the paper is entirely white W=(1, 1, 1) and the lines are some arbitrary colour L=(L1, L3, L3) (we're assuming there's only one colour line for the time being), and we know the colour of the line (this can be done without human intervention by picking the colour of the point with the highest intensity of which the RGB components aren't approximately equal), if you have a certain point P know that it's equal to (W-L)*p, which p is a scalar (a single value) between 0 and 1 depending on how hard you pressed the pencil. So, given that we know W and L we can determine p, and replace the point by W*p, which is what you actually drew. Oh, this also assume that your pencil is black (which it isn't but you can probably mess with the image settings to get it that way). As for the second colour line (and the third colour of the crossings), chances are as long as you know the L for each you can determine which of the three colours it is because (W-L)*p=(current colour) only has a solution for one of them.
The last, and more important problem of how to actually do this I can't help you with unless you have matlab handy, but I hope one of the people who actually have practical experience with the non-academic tools can help you with that.
posted by fvw at 11:20 AM on April 9, 2004
The last, and more important problem of how to actually do this I can't help you with unless you have matlab handy, but I hope one of the people who actually have practical experience with the non-academic tools can help you with that.
posted by fvw at 11:20 AM on April 9, 2004
Off the top of my head:
1) Use Photoshop's Hue adjustment to rotate the colors until the lines are entirely in one channel, probably the blue channel.
2) Copy one of the other channels into that channel.
posted by kindall at 12:55 PM on April 9, 2004
1) Use Photoshop's Hue adjustment to rotate the colors until the lines are entirely in one channel, probably the blue channel.
2) Copy one of the other channels into that channel.
posted by kindall at 12:55 PM on April 9, 2004
kindall's idea is good, but the lines are too "broadband" to fit into a single channel. You can get around that by raising the saturation first.
So here's the best I've come up with so far. It uses adjustment layers, which are (as I have just found) very useful. To add an adjustment layer, use Layer>New>Adjustment Layer and choose the type. So, starting with the original scan:
1) Add a Hue/Saturation adjustment layer. Change the saturation level to +80. This will narrow the hue range of the lines, making them easier to get rid of.
2) Add another Hue/Saturation adjustment layer on top of that. Then do two things:
2.1) (This is a bit tricky) You need to lighten the range of colors of the lines. So in the dropdown, choose "Blues" (or anything else, since you'll be changing what it gives you). Then, change the range of colors it's actually editing by dragging the triangles (hard edges of the range) and bars (beginning of range tapering) in the bar along the bottom.
You want to select everything *but* a small range around yellow, so you want the two triangles right next to each other, but pointing *towards* each other, and the bars right outside of those. To get them next to each other, you can drag one to an edge and then pull it around from where it shows up on the other edge. (Er, please ask questions if that doesn't make sense...)
Then, with that range selected, change lightness to around +75. This will lighten the lines and make them match the brightness of their surroundings, in general.
2.2) Lower the saturation back in the "Master" channel (in the "Edit:" dropdown list) to -100. This will make everything grayscale, which is pretty much the desired end result.
So now the lines are mostly gone, but still somewhat visible. There is still more you can do to clean it up a bit more:
3) Increase the contrast without exaggerating detail: Create a copy of the background layer. Drag it above every other layer. Image>Adjust>Desaturate. Filter>Noise>Median, 4 pixels. Set that layer's blending mode to "Multiply," transparency to 50%.
4) Clean up the levels and remove some traces of the lines: Add a Levels adjustment layer, above everything else. Wash out the highlights to get solid whites, etc. I set the input levels to (100, 1.0, 240) and the outputs to (64, 255). Using "Auto" and tweaking from there works well, too.
And of course, you can tweak any of the steps (values, order, etc.) to your heart's content, which is made especially easy by the use of adjustment layers.
From here, you can use the lighten/darken tools to touch up any specific areas you want.
Hope that helps! Oh, and I'm using Photoshop version SuperOldSchool (5.5), so sorry if things are different in your version.
posted by whatnotever at 4:01 PM on April 9, 2004
Response by poster: Thanks for the scheme, whatnotever -- seems to be working up to step 2.2 -- when I lower the saturation, it does indeed become greyscale, but the lines (that were much less noticeable before) become solid dark grey instead of disappearing.
No sweat, though, I can live with it as is!
posted by Hildago at 5:33 PM on April 9, 2004
No sweat, though, I can live with it as is!
posted by Hildago at 5:33 PM on April 9, 2004
Response by poster: This is in PS 7.0, by the way.. I didn't notice anything in the "edit" menu that would lower the saturation, so I did it in images-->adjustments-->hue/sat, and I could only do it on the background layer. Maybe there is some menu difference between 5 and 7 that is getting me confused .. that was the only step that I couldn't replicate exactly from your directions.
posted by Hildago at 5:35 PM on April 9, 2004
posted by Hildago at 5:35 PM on April 9, 2004
Whoops. In 2.2, the "Edit" dropdown is in the Hue/Saturation dialog box. The same dropdown from which you chose "Blues" in 2.1. Everything in step 2 is done in that dialog, all in the same adjustment layer.
(2.2 could be done by adding another Hue/Saturation adjustment layer with -100 saturation on everything. It would have to be above the two adjustment layers that remove the lines, though, because they count on the color being there to "find" the lines, basically.)
In the end, you should have the following layers (from bottom to top):
1 - the background - original image, unchanged
2 - hue/sat adjustment layer - increases saturation
3 - hue/sat adjustment layer - lightens everything but yellows, optionally desaturates everything
4 - copy of background, 4px median, 50% trans, multiply blending
5 - levels adjustment layer
posted by whatnotever at 7:35 PM on April 9, 2004
if you wanted to do this using some maths-based image processing program (idl say) you could try fourier filtering (those regular horizontal lines are just asking for a fourier filter of some kind) and principal components analysis of the colours, which might separate the coloured lines from the grey sketching.
posted by andrew cooke at 6:21 AM on April 10, 2004
posted by andrew cooke at 6:21 AM on April 10, 2004
Response by poster: Everyone in this thread was smarter than me. Andrew, you just nailed the coffin shut.
posted by Hildago at 9:21 PM on April 10, 2004
posted by Hildago at 9:21 PM on April 10, 2004
This thread is closed to new comments.
posted by ROU_Xenophobe at 11:46 PM on April 8, 2004