How to recreate the circle pattern found on Eames Storage Units?
November 5, 2014 4:23 PM Subscribe
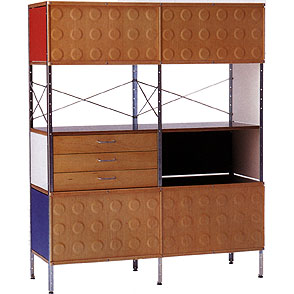
I would like to make an Eames storage unit, but am stuck on how to reproduce the raised circles found on its wood panels. Would veneer over thin metal disks work? Other ideas?
I'd like to build something like this. I believe the wooden panels are 'molded plywood', but am not certain. Any easy way to reproduce this effect? I'm considering epoxying some metal disks and putting a square of veneer over them. However I haven't worked with veneer before, so don't know if this would work. Thanks!
I'd like to build something like this. I believe the wooden panels are 'molded plywood', but am not certain. Any easy way to reproduce this effect? I'm considering epoxying some metal disks and putting a square of veneer over them. However I haven't worked with veneer before, so don't know if this would work. Thanks!
Yeahhhhh...its going to be really (really really) hard...if you're trying to save money vs finding an original eames, forget it. Those raised circles are a seriously industrial process involving steaming plywood while pressing it in a mold in a drill press under many tons of pressure. Keep looking. There's enough of those units out there that you can occasionally stumble upon a bargain.
posted by sexyrobot at 4:47 PM on November 5, 2014
posted by sexyrobot at 4:47 PM on November 5, 2014
Agree with the above that exactly duplicating those circles in even a very well-equipped shop is going to be close to impossible.
However--do you really have to duplicate exactly that? I think that Straw's "last resort" suggestion of gluing on some veneer circles could look really interesting, particularly if used a contrasting species of wood. Or thin metal circles. Or invert the pattern and use a router and a template to cut circles into your door. Or paint on some gold or black circles over the finished wood. There are a lot of creative things you could try.
posted by LarryC at 5:33 PM on November 5, 2014 [1 favorite]
What if you cut circles out of your door as well as from a second piece of slightly thinner wood? Then you could finish the edges of the door circles however you like, glue them to the second piece of slightly thinner wood and then glue that sandwich back into the door holes such that the grain lined up? That would be simple but would look good.
posted by carmicha at 7:00 PM on November 5, 2014
posted by carmicha at 7:00 PM on November 5, 2014
Best answer: Where are you located herman ? Do you have access to a Makerspace? The design in the image looks like it could be readily done on a CNC router, and most Makerspace facilities have one. A single month's membership in our local Makerspace is currently just $45.
posted by X4ster at 7:01 PM on November 5, 2014 [1 favorite]
posted by X4ster at 7:01 PM on November 5, 2014 [1 favorite]
Best answer: Any easy way to reproduce this effect?
No, not easy. I think X4ster's approach of using a CNC router is going to be the most practical option short of buying an original. I'd be inclined to start with a stable core of some kind (MDF or quality plywood), edge-band it with thick solid wood strips, and laminate thick solid wood facings onto the front and back. The front facing would have to be thicker than the back to provide enough material to mill out the contours. This is not a beginnery DIY kind of thing.
posted by jon1270 at 5:13 AM on November 6, 2014
This blog post doesn't explain in detail how panels like this were made but offers some clues, there is mention of molds and veneer - which probably just helps to confirm what Sexyrobot and LarryC said.
posted by Ness at 7:32 AM on November 6, 2014
posted by Ness at 7:32 AM on November 6, 2014
jon1270 has the right materials and steps for CNC milling of your project. The intent is to imitate the end result, not the original processes of manufacturing. If you decide that as a novice you can follow through on it you can start you can start with a small, scaled down, version using scrap MDF - maybe an 1/8 scale, then scale up to 1/4 scale for practice. It's really easy to scale up or down once you have a project designed for CNC router work.
posted by X4ster at 10:05 AM on November 6, 2014
posted by X4ster at 10:05 AM on November 6, 2014
So because I see way too much "CNC will solve all our problems!" in the world...
You could fairly easily make a template that'd trap a router with a fairly large guide bushing that'd let you cut half a line of circles to half the other line, and step this down the face.
If you can find an ogee bit of the appropriate very shallow depth and cut the bearing off of it (or get one without the bearing), that'd let you mill the rounded edges on the disk without just milling the cove with a bowl bit and then sanding the rounding on the top.
I do like the idea of a fairly thick, say 1/4" or so, veneer, and milling into that, rather than doing the whole panel as solid stock.
posted by straw at 11:27 AM on November 6, 2014 [1 favorite]
This thread is closed to new comments.
- Mill the whole thing out of a solid block of wood, using a router and a bowl-making bit to cut the recesses.
- Try cutting circles out of super thin stock, say 1/8" or so MDF, using a router with a "V" bit to give the edges of the MDF a bevel, gluing these to my door substrate, and then vacuum pressing a solid veneer sheet over the substrate plus circles, hoping that the veneer has enough stretch to form down over the circles.
- As a last resort, cutting circles from some relatively thin stock (like thicker veneer) and gluing them on. I say "last resort" because the grain wouldn't be continuous...
However, if you've got some 1/8" veneer (or thicker stock to 1/4" or so), and that's a reasonable height for your disks, you could take a hint from the marquetry folks and find a way to cut your circles out with an angled blade, and then place the wide side of your circle on the narrow part of your hole, giving a continuous grain without wasting a lot of stock I don't quite know how I'd go about cutting those circles out like that, but...posted by straw at 4:40 PM on November 5, 2014