Simulating an image that is out of register
May 29, 2014 9:55 AM Subscribe
I have a JPG that I want to appear as if it is out of register. It's to depict the idea of something being counterfeit.
I have access to Photoshop and Illustrator. I've read up on channels and separations and I've managed to get a file with the CMYK separations (print to PDF with separations), but they're grayscale and I need to get the color back for each.
It would be ideal to use the channels in Photoshop and somehow make them layers. I've isolated the image from its background.
I want to end up with an image that looks poorly printed and out of registration. I need to do this to several images. Is there a quick and easy way to achieve this? Or, is there some other effect I can apply that will signify "counterfeit"? Thanks for your help.
Duplicate the image so you have four layers, then use Levels or color balance, etc. to convert each to a component color, then shift each layer slightly so they're out of register.
posted by rhizome at 10:17 AM on May 29, 2014 [1 favorite]
posted by rhizome at 10:17 AM on May 29, 2014 [1 favorite]
Best answer: The channels only look grayscale. You are almost where you want to be.
Go Image/Canvas size. Make the canvas slightly bigger in both directions with the existing image in the middle. It will probably work best if the new canvas is white or transparent.
Now switch back to layers. Select a color layer (C, M, Y, or K) and then use the arrow keys to move that layer just a little - make it out of register, essentially. Then do the same with the other color layers. You can check on your results by clicking on the uppermost CMYK layer in the channels pallette.
Once you've got what you want, crop the image to to remove any blank canvas. Voila.
posted by Benny Andajetz at 10:30 AM on May 29, 2014 [3 favorites]
The above is for doing it directly in Photoshop, BTW. No changes necessary if your original image is CMYK. If it's RGB, first go to Image/Mode and choose CMYK.
posted by Benny Andajetz at 10:34 AM on May 29, 2014
posted by Benny Andajetz at 10:34 AM on May 29, 2014
Response by poster: Benny, is this after I do what rhizome suggests? 'Cause while I have 4 channels plus the CMYK channel, I only have one layer. All I'm doing is clicking the Channels window to see all the channels.
posted by divinitys.mortal.flesh at 10:35 AM on May 29, 2014
posted by divinitys.mortal.flesh at 10:35 AM on May 29, 2014
One layer is fine. You just need a little extra room around the image to move the channels out of register.
posted by Benny Andajetz at 10:40 AM on May 29, 2014
posted by Benny Andajetz at 10:40 AM on May 29, 2014
On preview, what Benny Andajetz said, unless you need to preserve an un-altered copy of the image as a layer. Do that instead of what rhizome suggests. If you do want to preserve an unaltered layer with the original image, you can do this:
In Photoshop, go into Channels pallette (it's usually tabbed next to Layers and Paths). Control-click (or command-click on Mac) on the thumbnail for one of the color channels. It will make a selection. Click back to Layers, make new layer, then fill it with the same color as the chanel you selected. Turn off the new color layer (or it will affect the channels).
Do this for all three color channels (assuming RGB colorspace). Make sure the new color layers are stacked in the same order as the channels appear in the Channels tab.
Make a new layer filled with black below the new color layers. Turn the color layers on.
Set the Red and Green layers to the "Lighten" blending mode. Then you can pick a layer and move it to create the off-register look you want. Careful - if the last thing you did was to change a blending mode, and you try to use your arrow keys to move the layer, you'll actually be cycling through different blending modes because that picker will still be active. You have to get the arrow tool and click into the image first.
Oops, you're using CMYK. You can do the same thing I think. I tested this method in RGB.
posted by under_petticoat_rule at 10:41 AM on May 29, 2014
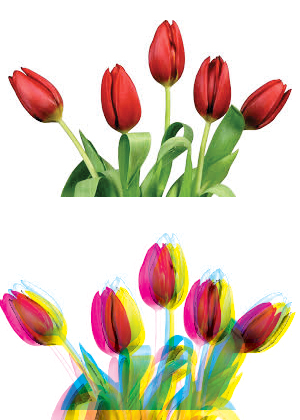
Best answer: Yes, Benny is correct. Go into 1 or more of the channels, select all and move them slightly (either with arrow keys or the move tool). Here's a quick mockup I did of what that would look like. Original image on top, out of register below.
posted by mon-ma-tron at 10:46 AM on May 29, 2014
posted by mon-ma-tron at 10:46 AM on May 29, 2014
Came back to say my method won't work for CMYK. I think there's a way to do it, but I haven't found the right blending modes to use.
posted by under_petticoat_rule at 10:50 AM on May 29, 2014
posted by under_petticoat_rule at 10:50 AM on May 29, 2014
I would try...
Duplicate the image into 2 layers.
In one layer select all of one color. Delete it.
On the other layer select all of that same color. Invert selection. Delete it.
(alternately try turning sliders up and down in the RGB)
I'm not sure if you would get a better result by doing a blending or by altering the transparency of the top layer. I don't think that will be perfect but it might be a decent simulation of out-of-reg.
posted by phearlez at 11:18 AM on May 29, 2014
Whenever I've needed an image that has to look "fake", I take an slightly out of focus photo with my phone. Simple, easy, and quick.
posted by Ideefixe at 11:36 AM on May 29, 2014
posted by Ideefixe at 11:36 AM on May 29, 2014
Play around with applying one of the distortion filters to a single color channel.
posted by Mister Moofoo at 12:33 PM on May 29, 2014
posted by Mister Moofoo at 12:33 PM on May 29, 2014
Best answer: Cause while I have 4 channels plus the CMYK channel, I only have one layer. All I'm doing is clicking the Channels window to see all the channels.
Here is an explanation of the channels palette. You want to select an individual channel for editing, but keep all channels visible. Then when you drag or nudge the image, it will only move the channel that's active. Because all the channels are visible, you can see how the end results will look. Repeat for the next channel, etc.
I don't think distortion filters on individual channels are a very plausible copying artifact. But adjusting the contrast and levels of each channel separately is the sort of thing that is kind of difficult to avoid. You can do this while editing the channels separately, but it'd probably be more convenient to just do it all at once via "curves", which has a setting to manipulate each channel separately. Tip: Use an adjustment layer for this instead of Image->Adjustments, so you can go back and re-tweak it.
posted by aubilenon at 12:44 PM on May 29, 2014 [1 favorite]
Best answer: Benny has it.
Extra credit: do a color halftone filter for that cheap comic book dotty look. (Select "CMYK" in the Channels list. Then Filter > Pixelate > Color Halftone.)
posted by the_blizz at 6:10 PM on May 29, 2014
Extra credit: do a color halftone filter for that cheap comic book dotty look. (Select "CMYK" in the Channels list. Then Filter > Pixelate > Color Halftone.)
posted by the_blizz at 6:10 PM on May 29, 2014
Oh, and if for some reason you do need the channels as layers, you can click the dropdown menu in the upper right hand corner of the channels palette and select Split Channels, which will create four new grayscale images, one for each channel. You can convert those to monotone (Image > Mode > Duotone) and choose cyan, magenta, etc, as appropriate for your ink color.
posted by the_blizz at 6:18 PM on May 29, 2014 [1 favorite]
posted by the_blizz at 6:18 PM on May 29, 2014 [1 favorite]
« Older I'm Little_Dog. Not an alcoholic. | Where to find higher education administration... Newer »
This thread is closed to new comments.
posted by unicornologist at 10:08 AM on May 29, 2014